Create a Fedora 16 Template
Getting Started Guide
1. Create the template
Create an XML file with the following content in it; the file name and extension doesn’t matter. Be sure to change the “rootpw” element.
<template>
  <name>Fedora 16 Template</name>
  <os>
    <name>Fedora</name>
    <version>16</version>
    <arch>x86_64</arch>
    <install type='url'>
      <url>http://download.fedoraproject.org/pub/fedora/linux/releases/16/Fedora/x86_64/os/</url>
    </install>
    <rootpw>p@ssw0rd</rootpw>
  </os>
  <description>A Fedora 16 Image Factory Template</description>
  <commands>
    <command name="F16 updates">yum update -y</command>
  </commands>
</template>
2. Build and transfer the image
Now use the aeolus-image command-line tool to build the image described in the XML.
$ aeolus-image build --target ec2,mock --template template.xml --environment default

Target Image                             Target     Status        Image                                    Build
------------------------------------     ------     ---------     ------------------------------------     ------------------------------------
1306b29e-a30e-4efd-a1fb-09753863d77c     ec2        COMPLETED     6214d1b6-7292-436f-9c62-f0852e469f70     995535c8-ee70-407c-9413-12d274bbdd1d
b33236d7-81b9-41b0-96f9-d039acd60537     mock       COMPLETED     6214d1b6-7292-436f-9c62-f0852e469f70     995535c8-ee70-407c-9413-12d274bbdd1d

Target Image: 663ad46e-709f-4ea1-89f0-e73b8bb2205a
Image: 6214d1b6-7292-436f-9c62-f0852e469f70
Build: 3b5624b1-c9a5-48e2-b6cb-2abecd232eb9
Status: COMPLETED
Percent Complete: 100
NOTE - The Image value is important.
We use it in a few steps below. If you lose it, you can always find it by typing:
aeolus-image list --images
Environments can be used to group deployments together. Out of the box, aeolus-configure sets up a “default” environment that you may use.
When building for EC2, this occurs in the form of a “snapshot build” that occurs in the cloud using your EC2 credentials. For all other providers, Image Factory will build an image locally inside of a virtual machine, so hardware virtualization support is required.
Once an image is built, we push it to a Cloud Provider using the account configured earlier.
aeolus-image just needs the Provider Account name (ec2_east) and the Image UUID given by the last command (6214d1b6-7292-436f-9c62-f0852e469f70). To push to the mock provider account, simply use “mock” as the account name.
$ aeolus-image push -A ec2_east -I 6214d1b6-7292-436f-9c62-f0852e469f70
Target Image: 2814a4e5-67a1-4dc3-b8be-8977bca61e8b
Provider Image: 19d97c85-3db3-41fa-bf92-63fb6fed738a   Status: New
Building and pushing can take some time, except for the mock provider. You can watch its progress by tailing the Image Factory and Image Warehouse logs:
$ tail -20f /var/log/imagefactory.log
[verbose progress information appears here]

$ tail -20f /var/log/iwhd.log
[verbose progress information appears here]
You will know it has finished when the output in the log file ceases after displaying an entry like this:
2011-11-24 10:08:49,375 DEBUG imgfac.ImageWarehouse.ImageWarehouse pid(3698) Message: Setting metadata ({'latest_unpushed': None})
for http://localhost:9090/images/609a6eee-5ec5-4b13-8486-7491d091f8dc
3. Verifying on the Amazon Cloud side
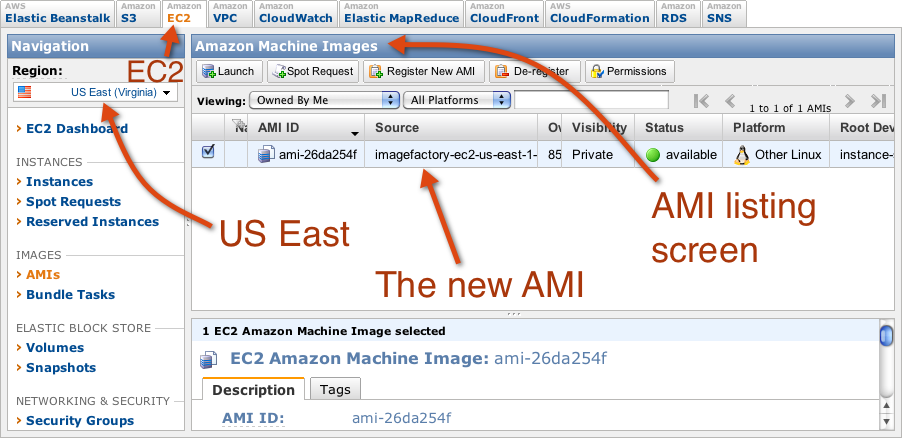
If you pushed the template to your Amazon EC2 account, load Amazon’s AWS Management Console in your web browser. You will see this image in your list of registered AMI’s:


